5. Pipeline创建流程
pipeline创建
在netty中, 事件在pipeline中传输, 用户可以中断事件, 添加自己的事件处理逻辑, 可以直接将事件中断不再往下传输, 同样可以改变管道的流向, 传递其他事件。
在netty中, 事件是通过handler对象进行处理的, 里面封装着事件的处理逻辑.而每个handler, 是由HandlerContext进行包装的, 里面封装了对事件传输的操作
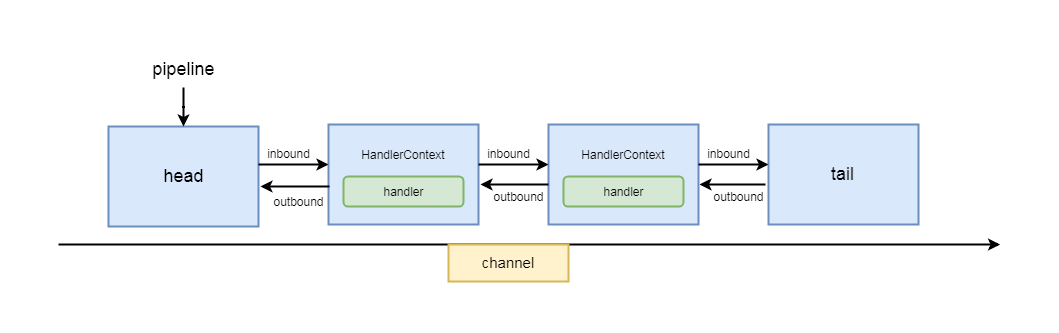
pipeline我们可以理解成是一个双向链表的数据结构, 只是其中存放的并不是数据而是HandlerContext, 而HandlerContext又包装了handler, 事件传输过程中, 从头结点(或者尾节点)开始, 找到下一个HandlerContext, 执行其Handler的业务逻辑, 然后再继续往下走, 直到执行到尾节点(或者头结点, 反向)为止, 通过一幅图了解其大概逻辑:
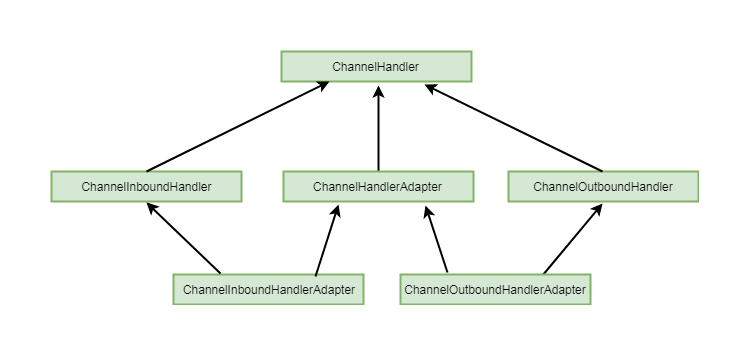
这里head代表pipeline的头结点, tail代表pipeline的尾节点, 这两个节点是会随着pipeline的初始化而创建, 并且不会被删除。HandlerContext的简单继承关系比较简单, 默认的是DefaultChannelHandlerContext, 继承于AbstractChannelHandlerContext。而Handler分为InboundHandler和outBoundHandler, Inbound专门处理inbound事件, outBound专门用于处理outBound事件
回顾NioServerSocketChannel的创建,在AbstractChannel的创建中创建了一个pipeline
1
2
3
4
5
6
7
8
9
10
11
12
13
14
15
16
17
18
19
20
21
22
23
24
protected AbstractChannel(Channel parent) {
    this.parent = parent;
    // 创建唯一ID
    id = newId();
    unsafe = newUnsafe();
    pipeline = newChannelPipeline();
}

protected DefaultChannelPipeline newChannelPipeline() {
    return new DefaultChannelPipeline(this);
}

// DefaultChannelPipeline#DefaultChannelPipeline
protected DefaultChannelPipeline(Channel channel) {
    this.channel = ObjectUtil.checkNotNull(channel, "channel");
    succeededFuture = new SucceededChannelFuture(channel, null);
    voidPromise = new VoidChannelPromise(channel, true);

    tail = new TailContext(this);
    head = new HeadContext(this);
	// 创建双向链表结构
    head.next = tail;
    tail.prev = head;
}
先跳过future和promise相关的部分,看看tail和head的部分
1
2
3
4
5
6
7
8
9
10
11
12
final class TailContext extends AbstractChannelHandlerContext implements ChannelInboundHandler {

    TailContext(DefaultChannelPipeline pipeline) {
        super(pipeline, null, TAIL_NAME, TailContext.class);
        setAddComplete();
    }

    public ChannelHandler handler() {
        return this;
    }
    // 省略代码
}
TailContext是DefaultChannelPipeline的内部类,继承了AbstractChannelHandlerContext类, 说明自身是个HandlerContext, 同时也实现ChannelInboundHander接口, 并且其中的handler()方法返回了自身, 说明自身也是handler, 而实现ChannelInboundHander, 说明自身只处理Inbound事件
1
2
3
4
5
6
7
8
9
AbstractChannelHandlerContext(DefaultChannelPipeline pipeline, EventExecutor executor,
                              String name, Class<? extends ChannelHandler> handlerClass) {
    this.name = ObjectUtil.checkNotNull(name, "name");
    this.pipeline = pipeline;
    this.executor = executor;
    this.executionMask = mask(handlerClass);
    // Its ordered if its driven by the EventLoop or the given Executor is an instanceof OrderedEventExecutor.
    ordered = executor == null || executor instanceof OrderedEventExecutor;
}
head节点同样继承了AbstractChannelHandlerContext,与tail不同的是, 这里实现了ChannelOutboundHandler接口和ChannelOutboundHandler接口, 说明其既能处理inbound事件也能处理outbound的事件, handler方法返归自身, 说明自身是一个handler。
那么为什么会存在这样的差异?
HeadContext同时实现ChannelOutboundHandler和ChannelInboundHandler的原因在于它需要能够处理管道中所有的入站和出站事件。作为管道的头部,HeadContext负责接收来自下游的入站消息,并将其传递给下一个处理器。同时,它也需要能够处理来自上游的出站消息,确保这些消息能够正确地发送到目标。
消息的处理过程如下:
- 当入站消息到达时,HeadContext会通过实现的ChannelInboundHandler接口接收这些消息,并将其传递给管道中的下一个处理器。
- 对于出站消息,HeadContext会通过ChannelOutboundHandler接口将消息发送到管道的上游,确保消息能够被正确地发送到目标。
- 这种双向处理能力使得HeadContext能够在同一个上下文中处理两种类型的事件,提供了更高的灵活性和可扩展性。
- 通过实现这两个接口,HeadContext可以直接参与到消息的流动中,确保在管道中所有的消息都能被适当地传递和处理。这对于构建复杂的网络应用程序是非常重要的,因为它允许开发者在管道的头部进行更细粒度的控制和处理。
相比之下,TailContext并不需要同时实现这两个接口。TailContext位于管道的尾部,主要负责处理出站消息的最终发送,而不需要接收入站消息。它的主要功能是将消息传递给底层的网络传输层,因此只需实现ChannelOutboundHandler接口。 这种设计简化了TailContext的实现,因为它不需要处理入站事件,从而减少了复杂性和潜在的错误。
1
2
3
4
5
6
7
8
9
10
11
12
13
14
15
final class HeadContext extends AbstractChannelHandlerContext
    implements ChannelOutboundHandler, ChannelInboundHandler {

    private final Unsafe unsafe;

    HeadContext(DefaultChannelPipeline pipeline) {
        super(pipeline, null, HEAD_NAME, HeadContext.class);
        unsafe = pipeline.channel().unsafe();
        setAddComplete();
    }

    @Override
    public ChannelHandler handler() {
        return this;
    }
添加Handler
在初始化时,已经为pipeline添加了handler
1
2
3
4
5
6
7
.childHandler(new ChannelInitializer<Channel>() {
    @Override
    protected void initChannel(Channel channel) throws Exception {
        ChannelPipeline pipeline = channel.pipeline();
        pipeline.addLast(new NettyServerHandler());
    }
});
主要剖析 pipeline.addLast(new NettyServerHandler()) 这部分代码的逻辑。
首先通过channel得到pipeline,再为其添加handler
1
2
3
4
5
6
7
8
9
10
11
12
13
14
15
16
17
18
19
20
21
22
23
24
25
26
27
28
29
30
31
32
33
34
35
36
37
38
39
40
41
42
43
44
45
46
47
48
49
50
51
52
53
54
55
56
57
58
59
60
61
62
63
64
65
66
67
68
69
// 使用可变参数传递多个handler
public final ChannelPipeline addLast(ChannelHandler... handlers) {
    return addLast(null, handlers);
}

@Override
public final ChannelPipeline addLast(EventExecutorGroup executor, ChannelHandler... handlers) {
    ObjectUtil.checkNotNull(handlers, "handlers");

    for (ChannelHandler h: handlers) {
        if (h == null) {
            break;
        }
        addLast(executor, null, h);
    }

    return this;
}

public final ChannelPipeline addLast(EventExecutorGroup group, String name, ChannelHandler handler) {
    return internalAdd(group, name, handler, null, AddStrategy.ADD_LAST);
}

private ChannelPipeline internalAdd(EventExecutorGroup group, String name,
                                    ChannelHandler handler, String baseName,
                                    AddStrategy addStrategy) {
    final AbstractChannelHandlerContext newCtx; // 新的处理上下文
    synchronized (this) { // 同步以确保线程安全
        checkMultiplicity(handler); // 检查处理器的多重性
        name = filterName(name, handler); // 过滤处理器名称

        newCtx = newContext(group, name, handler); // 创建新的处理上下文

        // 根据添加策略决定如何插入新的处理上下文
        switch (addStrategy) {
            case ADD_FIRST: // 添加到最前面
                addFirst0(newCtx);
                break;
            case ADD_LAST: // 添加到最后面
                addLast0(newCtx);
                break;
            case ADD_BEFORE: // 在指定的处理器之前添加
                addBefore0(getContextOrDie(baseName), newCtx);
                break;
            case ADD_AFTER: // 在指定的处理器之后添加
                addAfter0(getContextOrDie(baseName), newCtx);
                break;
            default:
                throw new IllegalArgumentException("unknown add strategy: " + addStrategy); // 抛出未知策略异常
        }

        // 如果注册为 false,表示通道尚未在事件循环中注册。
        // 在这种情况下,将上下文添加到管道中,并添加一个任务,
        // 一旦通道注册,将调用 ChannelHandler.handlerAdded(...)。
        if (!registered) {
            newCtx.setAddPending(); // 设置添加为待处理状态
            callHandlerCallbackLater(newCtx, true); // 延迟调用处理器回调
            return this; // 返回当前管道
        }

        EventExecutor executor = newCtx.executor(); // 获取新的处理上下文的执行器
        if (!executor.inEventLoop()) { // 如果不在事件循环中
            callHandlerAddedInEventLoop(newCtx, executor); // 在事件循环中调用处理器添加
            return this; // 返回当前管道
        }
    }
    callHandlerAdded0(newCtx); // 调用处理器添加方法
    return this; // 返回当前管道
}
添加的核心在于internalAdd:
- handler 重复性检查
- 创建新的 HandlerContext
- 添加 context
- 回调
首先看重复性检查
1
2
3
4
5
6
7
8
9
10
11
12
13
private static void checkMultiplicity(ChannelHandler handler) {
    // 判断 handler 是否是 ChannelHandlerAdapter 的实例
    if (handler instanceof ChannelHandlerAdapter) {
        ChannelHandlerAdapter h = (ChannelHandlerAdapter) handler; // 将 handler 转换为 ChannelHandlerAdapter 类型
        // 如果该处理器不是可共享的且已经被添加过,则抛出异常
        if (!h.isSharable() && h.added) {
            throw new ChannelPipelineException(
                h.getClass().getName() + // 获取处理器的类名
                " is not a @Sharable handler, so can't be added or removed multiple times."); // 异常信息
        }
        h.added = true; // 标记该处理器已被添加
    }
}
再来看这段里的isSharable方法:
1
2
3
4
5
6
7
8
9
10
11
12
13
14
15
16
    public boolean isSharable() {
        // 获取当前类的 Class 对象
        Class<?> clazz = getClass();
        // 从线程本地映射中获取处理器共享缓存
        Map<Class<?>, Boolean> cache = InternalThreadLocalMap.get().handlerSharableCache();
        // 检查缓存中是否存在该类的共享状态
        Boolean sharable = cache.get(clazz);
        // 如果缓存中不存在,则检查该类是否标记为 @Sharable
        if (sharable == null) {
            sharable = clazz.isAnnotationPresent(Sharable.class);
            // 将共享状态存入缓存
            cache.put(clazz, sharable);
        }
        // 返回该类的共享状态
        return sharable;
    }
从这个逻辑我们可以判断, 共享对象是可以重复添加的
1
if (!h.isSharable() && h.added)
如果是共享对象或者没有被添加, 则将ChannelHandlerAdapter的added设置为true, 代表已添加
1
2
3
4
5
6
7
8
9
10
11
12
13
14
15
16
17
18
19
20
21
22
23
24
25
26
27
28
name = filterName(name, handler);

private String filterName(String name, ChannelHandler handler) {
    if (name == null) {
        return generateName(handler);
    }
    checkDuplicateName(name);
    return name;
}

private void checkDuplicateName(String name) {
    if (context0(name) != null) {
        throw new IllegalArgumentException("Duplicate handler name: " + name);
    }
}

// 遍历链表
private AbstractChannelHandlerContext context0(String name) {
    AbstractChannelHandlerContext context = head.next;
    while (context != tail) {
        if (context.name().equals(name)) {
            return context;
        }
        context = context.next;
    }
    return null;
}
添加handler时名字为空,开始给handler命名,此后遍历链表验证唯一性
// 保证hadler链表唯一性?
再来看handlerContext的创建
1
2
3
4
5
6
7
8
9
10
11
12
13
14
15
16
17
18
19
20
21
22
23
24
newCtx = newContext(group, name, handler);

// 创建了一个DefaultChannelHandlerContext对象, 构造方法的参数中, 第一个this代表当前的pipeline对象, group为null, 所以childExecutor(group)也会返回null, name为handler的名字, handler为新添加的handler对象
private AbstractChannelHandlerContext newContext(EventExecutorGroup group, String name, ChannelHandler handler) {
    return new DefaultChannelHandlerContext(this, childExecutor(group), name, handler);
}

// 首先调用了父类的构造方法, 之后将handler赋值为自身handler的成员变量, HandlerConext和handler关系在此也展现了出来, 是一种组合关系
// 缺少 inbound outbound 判断
DefaultChannelHandlerContext(
    DefaultChannelPipeline pipeline, EventExecutor executor, String name, ChannelHandler handler) {
    super(pipeline, executor, name, handler.getClass());
    this.handler = handler;
}

AbstractChannelHandlerContext(DefaultChannelPipeline pipeline, EventExecutor executor,
                              String name, Class<? extends ChannelHandler> handlerClass) {
    this.name = ObjectUtil.checkNotNull(name, "name");
    this.pipeline = pipeline;
    this.executor = executor;
    this.executionMask = mask(handlerClass);
    // Its ordered if its driven by the EventLoop or the given Executor is an instanceof OrderedEventExecutor.
    ordered = executor == null || executor instanceof OrderedEventExecutor;
}
最后调用的AbstractChannelHandlerContext构造方法在创建head和tail节点时也调用过
创建完handlercontext后通过一个switch语句决定插入的方法
在调用时已经制定了插入方法
1
return internalAdd(group, name, handler, null, AddStrategy.ADD_LAST);
那么接着进入addLast0方法
1
2
3
4
5
6
7
private void addLast0(AbstractChannelHandlerContext newCtx) {
    AbstractChannelHandlerContext prev = tail.prev;
    newCtx.prev = prev;
    newCtx.next = tail;
    prev.next = newCtx;
    tail.prev = newCtx;
}
这里也就是双向链表的插入操作
完成插入后判断当前channel是否已经注册,此处先跳过
然后判断当前线程线程是否为eventLoop线程, 如果不是eventLoop线程, 就将添加回调事件封装成task交给eventLoop线程执行, 否则, 直接执行添加回调事件callHandlerAdded0(newCtx)
1
2
3
4
5
6
7
8
9
10
11
12
13
14
15
16
17
18
19
20
21
22
23
24
25
private void callHandlerAddedInEventLoop(final AbstractChannelHandlerContext newCtx, EventExecutor executor) {
    newCtx.setAddPending();
    executor.execute(new Runnable() {
        @Override
        public void run() {
            callHandlerAdded0(newCtx);
        }
    });
}

private void callHandlerAdded0(final AbstractChannelHandlerContext ctx) {
    try {
        ctx.callHandlerAdded();
    } catch (Throwable t) {
        // 省略代码
    }
}

final void callHandlerAdded() throws Exception {
    // We must call setAddComplete before calling handlerAdded. Otherwise if the handlerAdded method generates
    // any pipeline events ctx.handler() will miss them because the state will not allow it.
    if (setAddComplete()) {
        handler().handlerAdded(this);
    }
}
其中ctx是我们新创建的HandlerContext, 通过handler()方法拿到绑定的handler, 也就是新添加的handler, 然后执行handlerAdded(this)方法, 如果我们没有重写这个方法, 则会执行父类的该方法
1
2
3
4
5
6
7
/**
     * Do nothing by default, sub-classes may override this method.
     */
@Override
public void handlerAdded(ChannelHandlerContext ctx) throws Exception {
    // NOOP
}
没做任何操作, 也就是如果我们没有重写该方法时, 如果添加handler之后将不会做任何操作, 这里如果我们需要做一些业务逻辑, 可以通过重写该方法进行实现
pipeline 的删除
在完成pipeline添加后,是否还能移除呢?
如果用户在业务逻辑中进行ctx.pipeline().remove(this)这样的写法, 或者ch.pipeline().remove(new SimpleHandler())这样的写法, 则就是对handler进行删除。
来到DefaultChannelPipeline#remove(io.netty.channel.ChannelHandler)
1
2
3
4
public final ChannelPipeline remove(ChannelHandler handler) {
    remove(getContextOrDie(handler));
    return this;
}
犯法中调用了另一个remove方法,传入了getContextOrDie(handler)。该方法也只是将handler封装成一个AbstractChannelHandlerContext
1
2
3
4
5
6
7
8
private AbstractChannelHandlerContext getContextOrDie(ChannelHandler handler) {
    AbstractChannelHandlerContext ctx = (AbstractChannelHandlerContext) context(handler);
    if (ctx == null) {
        throw new NoSuchElementException(handler.getClass().getName());
    } else {
        return ctx;
    }
}
最后还是从channelHandler链表中找出持有该handler的ChannelHandlerContext
1
2
3
4
5
6
7
8
9
10
11
12
13
14
15
16
17
public final ChannelHandlerContext context(ChannelHandler handler) {
    ObjectUtil.checkNotNull(handler, "handler");

    AbstractChannelHandlerContext ctx = head.next;
    for (;;) {

        if (ctx == null) {
            return null;
        }

        if (ctx.handler() == handler) {
            return ctx;
        }

        ctx = ctx.next;
    }
}
在进入到所调用的另一个remove方法
1
2
3
4
5
6
7
8
9
10
11
12
13
14
15
16
17
18
19
20
21
22
23
24
25
26
27
28
29
30
31
32
33
34
35
36
private AbstractChannelHandlerContext remove(final AbstractChannelHandlerContext ctx) {
    // 确保要移除的上下文不是头部或尾部上下文
    assert ctx != head && ctx != tail;

    // 使用同步块确保在移除处理程序时的线程安全
    synchronized (this) {
        // 从处理程序列表中原子性地移除指定的上下文
        atomicRemoveFromHandlerList(ctx);

        // 检查通道是否已注册到事件循环中
        // 如果未注册,表示通道尚未在事件循环中注册
        // 在这种情况下,从管道中移除上下文,并添加一个任务
        // 一旦通道注册,就会调用 ChannelHandler.handlerRemoved(...)
        if (!registered) {
            callHandlerCallbackLater(ctx, false);
            return ctx; // 返回当前上下文
        }

        // 获取当前上下文的事件执行器
        EventExecutor executor = ctx.executor();
        // 如果当前线程不在事件执行器的事件循环中
        if (!executor.inEventLoop()) {
            // 在事件执行器中异步执行移除处理程序的操作
            executor.execute(new Runnable() {
                @Override
                public void run() {
                    callHandlerRemoved0(ctx); // 调用处理程序移除方法
                }
            });
            return ctx;
        }
    }
    // 如果当前线程在事件执行器的事件循环中,直接调用处理程序移除方法
    callHandlerRemoved0(ctx);
    return ctx;
}
首先确保删除的不是head或tail
然后使用atomicRemoveFromHandlerList(ctx)进行实际的删除,该方法使用了synchronized来修饰,保证了原子性。
1
2
3
4
5
6
private synchronized void atomicRemoveFromHandlerList(AbstractChannelHandlerContext ctx) {
    AbstractChannelHandlerContext prev = ctx.prev;
    AbstractChannelHandlerContext next = ctx.next;
    prev.next = next;
    next.prev = prev;
}
执行删除之后判断channel是否被注册过,如果没有创建回调事件,一旦通道注册,就会调用 ChannelHandler.handlerRemoved(…)。
此后和添加handler时的逻辑一样,如果当前线程不在事件执行器的事件循环中,提交一个新的任务进行删除。
调用的函数为ChannelHandler#handlerRemoved
1
2
3
4
5
6
7
/**
     * Do nothing by default, sub-classes may override this method.
     */
@Override
public void handlerRemoved(ChannelHandlerContext ctx) throws Exception {
    // NOOP
}
和添加一样,是一个空实现。
pipeline事件传播
inbound
们自己的handler往往会通过重写channelRead方法来处理对方发来的数据, 那么对方发来的数据是如何走到channelRead方法中呢?
存在两种重写方式:
1
2
3
4
5
6
public void channelRead(ChannelHandlerContext ctx, Object msg) throws Exception {
    //写法1
    ctx.pipeline().fireChannelRead(msg);
    //写法2
    ctx.fireChannelRead(msg);
}
方法1
首先获取到ctx的pipeline,再调用pipeline的fireChannelRead方法。默认创建的DefaultChannelPipeline。
1
2
3
4
5
6
7
8
9
10
11
12
13
14
15
16
17
18
19
public final ChannelPipeline fireChannelRead(Object msg) {
    AbstractChannelHandlerContext.invokeChannelRead(head, msg);
    return this;
}

static void invokeChannelRead(final AbstractChannelHandlerContext next, Object msg) {
    final Object m = next.pipeline.touch(ObjectUtil.checkNotNull(msg, "msg"), next);
    EventExecutor executor = next.executor();
    if (executor.inEventLoop()) {
        next.invokeChannelRead(m);
    } else {
        executor.execute(new Runnable() {
            @Override
            public void run() {
                next.invokeChannelRead(m);
            }
        });
    }
}
Object m通常就是我们传入的msg,而next是head节点, 然后再判断是否为当前eventLoop线程, 如果不是则将方法包装成task交给eventLoop线程处理。这里的pipeline.touch是为了防止消息造成内存泄漏而使用的引用计数。
和之前一样,判断当前线程是否是eventLoop,不是则提交新任务给eventLoop进行处理。
1
2
3
4
5
6
7
8
9
10
11
12
13
14
15
16
17
18
19
20
21
22
private void invokeChannelRead(Object msg) {
    if (invokeHandler()) {
        try {
            // DON'T CHANGE
            // Duplex handlers implements both out/in interfaces causing a scalability issue
            // see https://bugs.openjdk.org/browse/JDK-8180450
            final ChannelHandler handler = handler();
            final DefaultChannelPipeline.HeadContext headContext = pipeline.head;
            if (handler == headContext) {
                headContext.channelRead(this, msg);
            } else if (handler instanceof ChannelDuplexHandler) {
                ((ChannelDuplexHandler) handler).channelRead(this, msg);
            } else {
                ((ChannelInboundHandler) handler).channelRead(this, msg);
            }
        } catch (Throwable t) {
            invokeExceptionCaught(t);
        }
    } else {
        fireChannelRead(msg);
    }
}
通过invokeHandler()判断当前handler是否已添加, 如果添加, 则执行当前handler的chanelRead方法。通过fireChannelRead方法传递事件的过程中, 其实就是找到相关handler执行其channelRead方法。
1
2
3
4
5
6
7
8
public void channelRead(ChannelHandlerContext ctx, Object msg) {
    ctx.fireChannelRead(msg);
}

public ChannelHandlerContext fireChannelRead(final Object msg) {
    invokeChannelRead(findContextInbound(MASK_CHANNEL_READ), msg);
    return this;
}
最后通过fireChannelRead继续向下传递channelRead事件。
方法2
1
2
3
4
public ChannelHandlerContext fireChannelRead(final Object msg) {
    invokeChannelRead(findContextInbound(MASK_CHANNEL_READ), msg);
    return this;
}
1
2
3
4
5
6
7
8
9
10
11
12
13
14
15
16
17
18
19
20
21
22
23
24
25
26
27
28
29
private AbstractChannelHandlerContext findContextInbound(int mask) {
    AbstractChannelHandlerContext ctx = this;
    EventExecutor currentExecutor = executor();
    do {
        ctx = ctx.next;
    } while (skipContext(ctx, currentExecutor, mask, MASK_ONLY_INBOUND));
    return ctx;
}

    /**
     * 检查是否可以跳过当前的上下文。
     * 该方法确保正确处理 MASK_EXCEPTION_CAUGHT,因为它不包含在 MASK_EXCEPTION_CAUGHT 中。
     *
     * 跳过上下文的条件是:
     * 1. 当前上下文的执行掩码与提供的掩码和仅掩码的按位与结果为 0,这意味着当前上下文不处理与提供的掩码相关的事件。
     * 换句话说,如果当前上下文的掩码没有与传入的掩码重叠,那么它就可以被跳过。
     * 2. 如果当前上下文的事件执行器与传入的事件执行器相同,并且当前上下文的执行掩码与提供的掩码的按位与结果为 0,
     * 这表示当前上下文可以安全地跳过,因为它不会影响事件的处理顺序。
     * 简单来说,如果当前上下文和传入的执行器是同一个,并且它的掩码不处理传入的事件,那么我们可以直接跳过这个上下文。
     *
     * 这确保了在不同的事件执行器之间保持事件的顺序。
     *
     * 参考: https://github.com/netty/netty/issues/10067
     */
    private static boolean skipContext(
            AbstractChannelHandlerContext ctx, EventExecutor currentExecutor, int mask, int onlyMask) {
        return (ctx.executionMask & (onlyMask | mask)) == 0 ||
                (ctx.executor() == currentExecutor && (ctx.executionMask & mask) == 0);
    }
通过一个doWhile循环, 找到当前handlerContext的下一个节点。skipContext的逻辑就是选择下一个inbound handler。
找到合适的节点后调用invokeChannelRead传入节点和消息对象。
1
2
3
4
5
6
7
8
9
10
11
12
13
14
15
16
17
18
19
20
21
22
23
24
25
26
27
28
29
30
31
32
33
34
35
36
37
static void invokeChannelRead(final AbstractChannelHandlerContext next, Object msg) {
    final Object m = next.pipeline.touch(ObjectUtil.checkNotNull(msg, "msg"), next);
    EventExecutor executor = next.executor();
    if (executor.inEventLoop()) {
        next.invokeChannelRead(m);
    } else {
        executor.execute(new Runnable() {
            @Override
            public void run() {
                next.invokeChannelRead(m);
            }
        });
    }
}

private void invokeChannelRead(Object msg) {
    if (invokeHandler()) {
        try {
            // DON'T CHANGE
            // Duplex handlers implements both out/in interfaces causing a scalability issue
            // see https://bugs.openjdk.org/browse/JDK-8180450
            final ChannelHandler handler = handler();
            final DefaultChannelPipeline.HeadContext headContext = pipeline.head;
            if (handler == headContext) {
                headContext.channelRead(this, msg);
            } else if (handler instanceof ChannelDuplexHandler) {
                ((ChannelDuplexHandler) handler).channelRead(this, msg);
            } else {
                ((ChannelInboundHandler) handler).channelRead(this, msg);
            }
        } catch (Throwable t) {
            invokeExceptionCaught(t);
        }
    } else {
        fireChannelRead(msg);
    }
}
这里已经分析过,第一次进入时从head向下传递inbound事件,再一次进入invokeChannelRead时,此时已经不是head,会走到else分支,也就是自定义的HandlerConext最终进入自定义的channelRead
1
2
3
4
5
6
public void channelRead(ChannelHandlerContext ctx, Object msg) throws Exception {
    //写法1
    ctx.pipeline().fireChannelRead(msg);
    //写法2
    ctx.fireChannelRead(msg);
}
解释了最初提到过的两种写法的区别:
写法1是通过头节点点往下传播事件
写法2是通过当前节往下传递事件
如果自定义代码中channelRead方法如果没有显示的调用ctx.fireChannelRead(msg)那么事件则不会再往下传播, 则事件会在这里终止, 这时就需要考虑有关资源释放的相关操作
根据之前分析的ctx.fireChannelRead(msg)会将事件继续向下传播,终会调用到tail节点的channelRead方法
1
2
3
4
5
6
7
8
9
10
11
12
public void channelRead(ChannelHandlerContext ctx, Object msg) {
    onUnhandledInboundMessage(ctx, msg);
}
protected void onUnhandledInboundMessage(Object msg) {
    try {
        logger.debug(
            "Discarded inbound message {} that reached at the tail of the pipeline. " +
            "Please check your pipeline configuration.", msg);
    } finally {
        ReferenceCountUtil.release(msg);
    }
}
最后执行资源释放操作。
outbound
对于outbond事件,也可以通过重写channelActive方法来自定义
1
2
3
4
5
6
public void channelActive(ChannelHandlerContext ctx) throws Exception {
    // 写法1
    ctx.channel().write("test data");
    // 写法2
    ctx.write("test data");
}
当然, 直接调用write方法不能往对方channel中写入数据, 因为这种方式只能写入到缓冲区, 还要调用flush方法才能将缓冲区数据刷到channel中, 或者直接调用writeAndFlush方法
方法1
首先通过channel方法得到ctx所绑定的pipeline的channel。
1
2
3
4
5
6
7
8
9
10
11
12
13
14
15
public ChannelFuture write(Object msg) {
    return pipeline.write(msg);
}

public ChannelFuture write(Object msg) {
    return write(msg, newPromise());
}

public final ChannelFuture write(Object msg) {
    return tail.write(msg);
}

public ChannelFuture write(Object msg) {
    return write(msg, newPromise());
}
通过pipeline来写入数据,最后调用的是tail节点的write方法,也就意味着outbond事件通过tail向上传播。
1
2
3
public ChannelFuture write(Object msg) {
    return write(msg, newPromise());
}
newPromise方法创建了一个Promise对象,暂时先跳过Promise的内容,接着看write方法。
1
2
3
4
5
6
7
8
9
10
11
12
13
14
15
16
17
18
19
20
21
22
23
24
25
26
27
28
29
30
31
32
33
34
35
36
37
38
39
public ChannelFuture write(final Object msg, final ChannelPromise promise) {
    write(msg, false, promise);
    return promise;
}

private void write(Object msg, boolean flush, ChannelPromise promise) {
    ObjectUtil.checkNotNull(msg, "msg");
    try {
        if (isNotValidPromise(promise, true)) {
            ReferenceCountUtil.release(msg);
            // cancelled
            return;
        }
    } catch (RuntimeException e) {
        ReferenceCountUtil.release(msg);
        throw e;
    }

    final AbstractChannelHandlerContext next = findContextOutbound(flush ?
                                                                   (MASK_WRITE | MASK_FLUSH) : MASK_WRITE);
    final Object m = pipeline.touch(msg, next);
    EventExecutor executor = next.executor();
    if (executor.inEventLoop()) {
        if (flush) {
            next.invokeWriteAndFlush(m, promise);
        } else {
            next.invokeWrite(m, promise);
        }
    } else {
        final WriteTask task = WriteTask.newInstance(next, m, promise, flush);
        if (!safeExecute(executor, task, promise, m, !flush)) {
            // We failed to submit the WriteTask. We need to cancel it so we decrement the pending bytes
            // and put it back in the Recycler for re-use later.
            //
            // See https://github.com/netty/netty/issues/8343.
            task.cancel();
        }
    }
}
此处的逻辑与inbond时类似,方法中首先对验证Promise的合法性,再通过findContextOutbound方法寻找
1
2
3
4
5
6
7
8
private AbstractChannelHandlerContext findContextOutbound(int mask) {
    AbstractChannelHandlerContext ctx = this;
    EventExecutor currentExecutor = executor();
    do {
        ctx = ctx.prev;
    } while (skipContext(ctx, currentExecutor, mask, MASK_ONLY_OUTBOUND));
    return ctx;
}
与inbound时的情形一样,之不说入参的MASK_ONLY_INBOUND换成了MASK_ONLY_OUTBOUND,来找到上一个outbond事件。
write方法中随后然后判断是当前线程是不是eventLoop线程, 如果是不是, 则封装成task异步执行, 如果不是, 则继续判断是否调用了flush方法, 因为我们这里没有调用, 所以会执行到next.invokeWrite(m, promise)
1
2
3
4
5
6
7
void invokeWrite(Object msg, ChannelPromise promise) {
    if (invokeHandler()) {
        invokeWrite0(msg, promise);
    } else {
        write(msg, promise);
    }
}
在这里会调用invokeHandler方法来判断当前的handler是否是添加状态,此处返回true,进入到invokeWrite0方法
1
2
3
4
5
6
7
8
9
10
11
12
13
14
15
16
17
18
19
20
21
22
23
24
25
26
private void invokeWrite0(Object msg, ChannelPromise promise) {
    try {
        // DON'T CHANGE
        // 双工处理器同时实现出站和入站接口,这会导致可扩展性问题
        // 参见 https://bugs.openjdk.org/browse/JDK-8180450
        final ChannelHandler handler = handler(); // 获取当前的 ChannelHandler
        final DefaultChannelPipeline.HeadContext headContext = pipeline.head; // 获取管道的 head节点
        // 检查当前处理器是否为管道的 head节点
        if (handler == headContext) {
            // 如果是头上下文,调用其写方法
            headContext.write(this, msg, promise);
        } else if (handler instanceof ChannelDuplexHandler) {
            // 如果处理器是双工处理器,调用其写方法
            ((ChannelDuplexHandler) handler).write(this, msg, promise);
        } else if (handler instanceof ChannelOutboundHandlerAdapter) {
            // 如果处理器是出站处理器适配器,调用其写方法
            ((ChannelOutboundHandlerAdapter) handler).write(this, msg, promise);
        } else {
            // 否则,调用通用的出站处理器的写方法
            ((ChannelOutboundHandler) handler).write(this, msg, promise);
        }
    } catch (Throwable t) {
        // 捕获异常并通知出站处理器发生异常
        notifyOutboundHandlerException(t, promise);
    }
}
此处得到handler就是head节点,进入head节点的write方法。
1
2
3
public void write(ChannelHandlerContext ctx, Object msg, ChannelPromise promise) {
    unsafe.write(msg, promise);
}
最后使用unsafe执行最终的写操作。
方法2
方法2首先进入AbstractChannelHandlerContext#write(java.lang.Object)方法
1
2
3
4
5
6
7
8
9
public ChannelFuture write(Object msg) {
    return write(msg, newPromise());
}
public ChannelFuture write(final Object msg, final ChannelPromise promise) {
    write(msg, false, promise);

    return promise;
}
/.../
之后的调用与方法1相同,向上找到第一个outbond方法后执行write方法,不再赘述。
最后贴上io.netty.channel.ChannelPipeline注释中的I/O事件处理过程。
1
2
3
4
5
6
7
8
9
10
11
12
13
14
15
16
17
18
19
20
21
22
23
24
25
26
27
28
29
30
31
32
33
34
35
36
37
38
                                               I/O Request
                                          via {@link Channel} or
                                      {@link ChannelHandlerContext}
                                                    |
+---------------------------------------------------+---------------+
|                           ChannelPipeline         |               |
|                                                  \|/              |
|    +---------------------+            +-----------+----------+    |
|    | Inbound Handler  N  |            | Outbound Handler  1  |    |
|    +----------+----------+            +-----------+----------+    |
|              /|\                                  |               |
|               |                                  \|/              |
|    +----------+----------+            +-----------+----------+    |
|    | Inbound Handler N-1 |            | Outbound Handler  2  |    |
|    +----------+----------+            +-----------+----------+    |
|              /|\                                  .               |
|               .                                   .               |
| ChannelHandlerContext.fireIN_EVT() ChannelHandlerContext.OUT_EVT()|
|        [ method call]                       [method call]         |
|               .                                   .               |
|               .                                  \|/              |
|    +----------+----------+            +-----------+----------+    |
|    | Inbound Handler  2  |            | Outbound Handler M-1 |    |
|    +----------+----------+            +-----------+----------+    |
|              /|\                                  |               |
|               |                                  \|/              |
|    +----------+----------+            +-----------+----------+    |
|    | Inbound Handler  1  |            | Outbound Handler  M  |    |
|    +----------+----------+            +-----------+----------+    |
|              /|\                                  |               |
+---------------+-----------------------------------+---------------+
                |                                  \|/
+---------------+-----------------------------------+---------------+
|               |                                   |               |
|       [ Socket.read() ]                    [ Socket.write() ]     |
|                                                                   |
|  Netty Internal I/O Threads (Transport Implementation)            |
+-------------------------------------------------------------------+